How to install your tracking tag
The complete guide to the Integration setup page: copy the tag, paste it into your site, prove it works, and read every status on the page.
By Nora Ellis, Affiliate Marketing & Creator Economy Writer · with Wooly Network, Advertiser Success · 3 September 2026 · 12 min · Tracking & Attribution
This is the guide to the Integration setup tab in your advertiser dashboard, the one page that connects your website, your app or your server to Wooly Network. Follow it end to end, and you will have your tag installed, your first event arriving, every status on that page explained, and a way to prove it all works before you launch anything.
It takes about ten minutes on most websites. You do not need a developer for the website tag.
What the tag actually does
A tracking tag is a few lines of code that sit on your website. It has exactly one job: remember which creator sent a visitor, and say when something important happened. Nothing else.
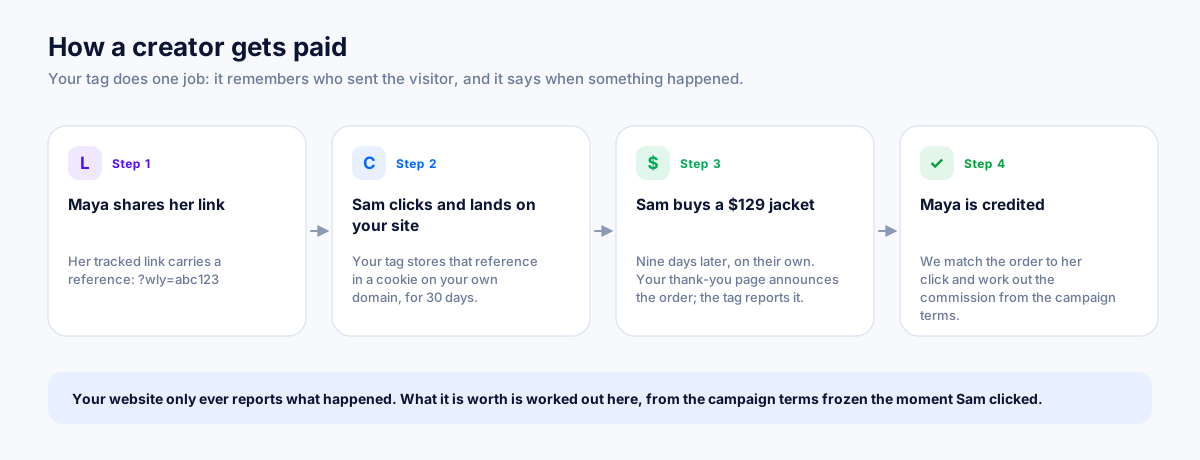
Your website only ever reports what happened. What it is worth is worked out on Wooly Network, from the campaign terms that were frozen the moment the visitor clicked, so nothing your site sends can change a payout.
Three things follow from that, and they are worth knowing before you paste anything:
- There is one tag, forever. Not one per campaign, not one per event. The same paste covers visits, clicks, sales, signups, and refunds, including campaigns you launch in two years.
- It does not slow your site down. It loads with
async, so the browser draws your page first and fetches the tag when it has a spare moment. - It reads almost nothing. One cookie on your own domain holding the creator reference. No names, no card details, no browsing on other websites.
Before you start
- An active plan. Your tracking key is issued the moment a plan starts. Without one the whole page is readable as a preview, the code box shows a placeholder key that reports nothing, and there is deliberately no copy button on it.
- Access to your website's header. On Shopify that is your theme code, on WordPress, a header plugin; on Webflow the project settings. If somebody else manages your site, this guide is the thing to forward to them.
- Nothing else. No developer, no account with another company, no third-party tag manager unless you already use one.
The page, top to bottom
Open Integration setup from the sidebar of your advertiser dashboard. Everything is on one page, in the order you actually do it.
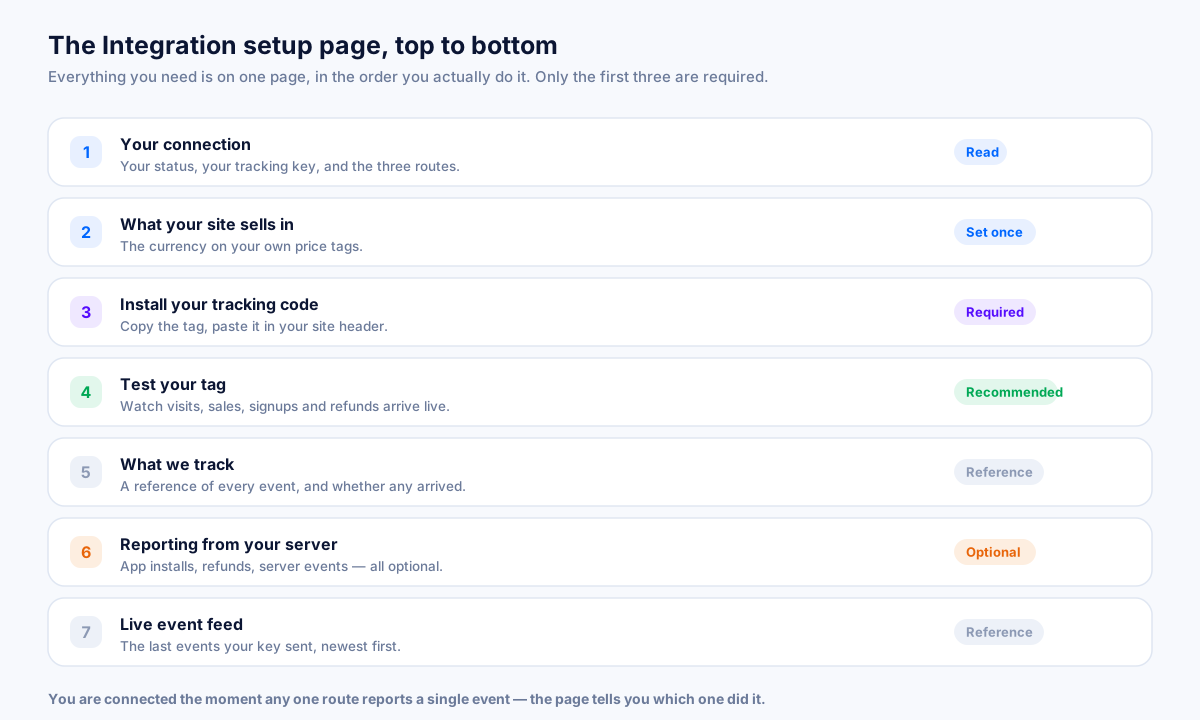
Only the first three matter for most advertisers. The rest are a reference, or exist for businesses that do not sell through a website at all.
Part 1: Your connection
The first panel is the answer to “am I done?”. It holds three things: your status, your tracking key, and the three routes an account can connect through.
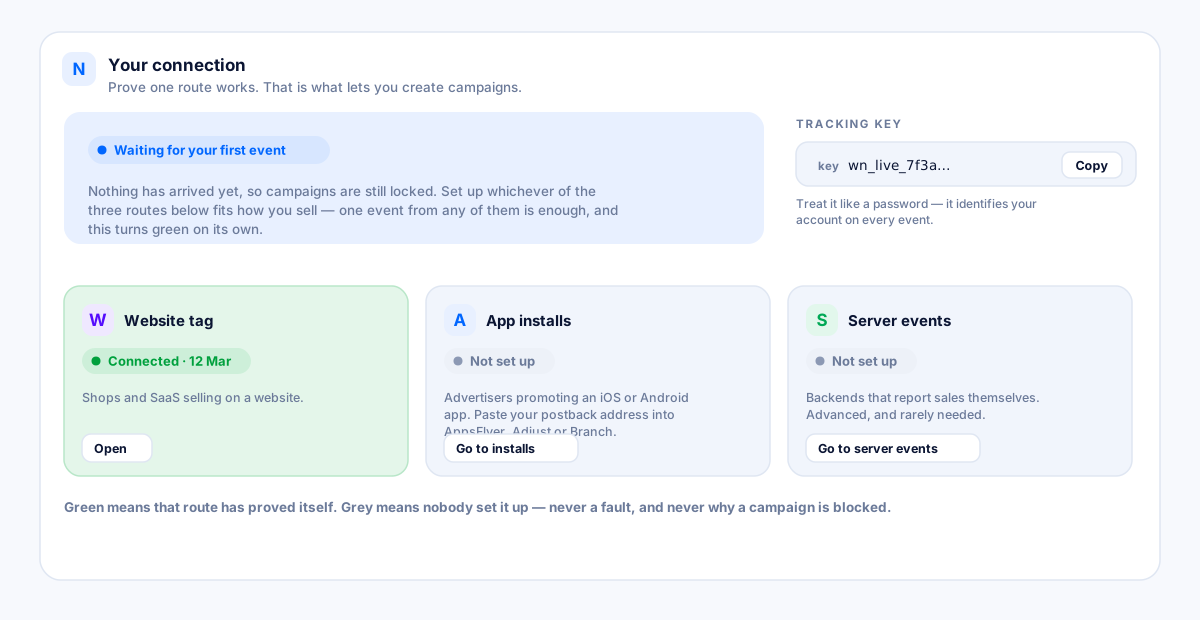
The badge at the top
It has three possible readings, and they are not interchangeable:
| What it says | What it means | What to do |
|---|---|---|
| Connected via your website tag (green) | Events are reaching us through that route. Campaigns are unlocked. | Nothing. It also names which route is connected: app installs or your server, if that is how you sell. |
| Waiting for your first event (blue) | Your key exists, but nothing has arrived yet. | Finish the install below, then open any page of your own site. |
| Nothing connected yet (blue) | You are reading the preview, no plan is active, so no key has been issued. | Choose a plan. Everything on the page is real apart from the credentials. |
Beside the badge you may also see a chip reading, for example, 1,284 website events received. That counter is the website's only. An account connected by app installs alone will correctly show nothing there, and the route cards underneath are what say so.
The three routes
There is one gate on this platform: you cannot create a campaign until your account has proved that events can reach us, and there are three completely different ways to satisfy it:
- Website tag; shops and SaaS selling on a website. A couple of minutes.
- App installs; advertisers promoting an iOS or Android app. Paste a postback address into AppsFlyer, Adjust, or Branch.
- Server events; backends that report sales themselves. Advanced, and rarely needed.
The rule that matters: a route nobody chose is never a problem. An unset route reads grey and says “Not set up”, and that is all it means. If you have no mobile app, the App installs card staying grey forever is correct and is never the reason a campaign is blocked. Your account is connected as soon as any one route is.
Your tracking key
The long wn_live_… value is your tracking key. It names your account, which is how we know the events are yours.
It is meant to be public. Step 2 below puts it in the source of every page on your website where anyone can read it, exactly like a Google Analytics or Meta Pixel ID, and nothing to worry about. The credentials that do need protecting are the server addresses further down the page, which carry a private secret alongside this key.
Part 2: Tell us what your site sells in
Just below the connection panel is What your site sells in. Set it to the currency on your own price tags, the one your checkout charges in. We convert everything to keep one set of books, and this is what the conversion is measured from.
Do it before you copy the tag: the example code further down is written in whatever you choose here, so the snippet you paste is already right for your shop.
Part 3: Install your tracking code
Step 1: Copy your tag
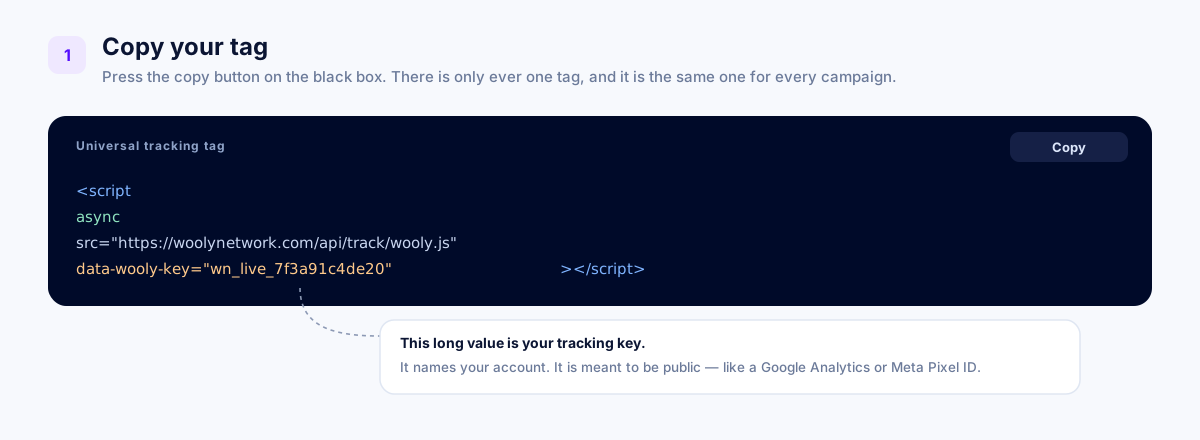
Press the copy button on the black box in Install your tracking code. The tag itself is two lines:
<!-- Wooly Network. Paste into your site's header, once. This is the only code. --> <script async src="https://woolynetwork.com/api/track/wooly.js" data-wooly-key="wn_live_…"></script>The comment block that comes with it is a cheat sheet for whoever maintains that template a year from now; leave it in.
If you have no plan yet, the copy button is deliberately missing. The key printed in the preview is a placeholder, so a tag copied from there would sit on your site looking installed and report nothing. Your real key appears in that same box the moment a plan starts.
Step 2: Paste it into your website once
It goes in the <head> of your site, the box your platform calls “header code”, “code injection,” or “scripts in header”. Almost every platform has one place that applies to every page, which is why you only do this once.
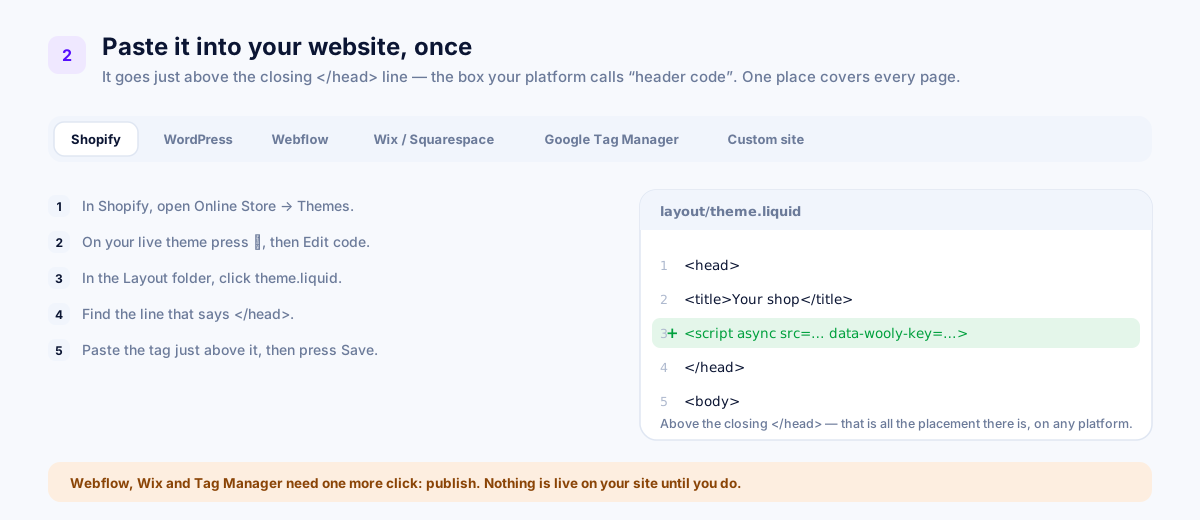
The panel has a tab for each platform. The code and the place it belongs never change, only the name of the box you paste it in does.
| Platform | Where it goes |
|---|---|
| Shopify | Online Store → Themes → ⋯ → Edit code → Layout → theme.liquid, just above </head>, then Save. |
| WordPress | Install a free header plugin (WPCode, or Insert Headers and Footers). Paste into the box called Header or Scripts in header, then Save. |
| Webflow | Project settings → Custom code → Head code. Save changes, then press Publish. |
| Wix | Settings → Custom code → Add code. Choose All pages and Head. |
| Squarespace | Settings → Developer tools → Code injection → Header. |
| Google Tag Manager | New tag → Custom HTML. Paste it in, set the trigger to All Pages, Save, then Submit to publish the container. |
| A site your developer built | Send them the tag and this sentence: put it in the root document head, on every page. In Next.js that is app/layout.tsx; in a plain site, index.html. One place is enough; it does not go in each component. |
Webflow, Wix, Squarespace and Google Tag Manager all need one extra click after saving: publish. Nothing is live on your real site until you do, and this is the single most common reason the card never turns green.
Step 3: Check it turned green
Publish your change, then open any page of your own website in a normal browser tab. Come back to Integration setup. Within a few seconds, on its own:
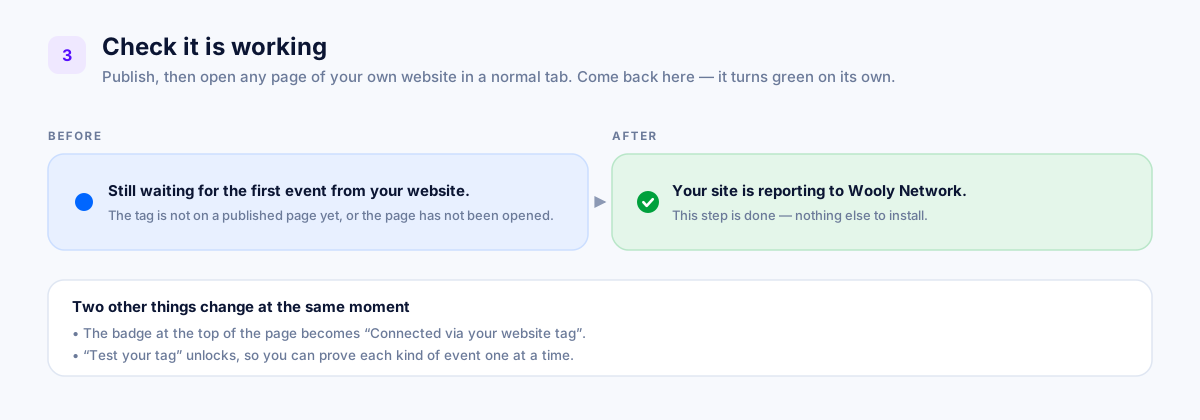
Three things change at the same moment: the line in step 3 turns green, the badge at the top of the page becomes Connected via your website tag, and the Test your tag panel below unlocks.
That is the whole installation. Everything after this point is proving it, or covering things a browser cannot see.
Part 4: Test your tag
Installing the tag proves your site can say hello. It does not prove your site reports a sale. That is what this panel is for, and it is worth doing before you publish a campaign rather than after.
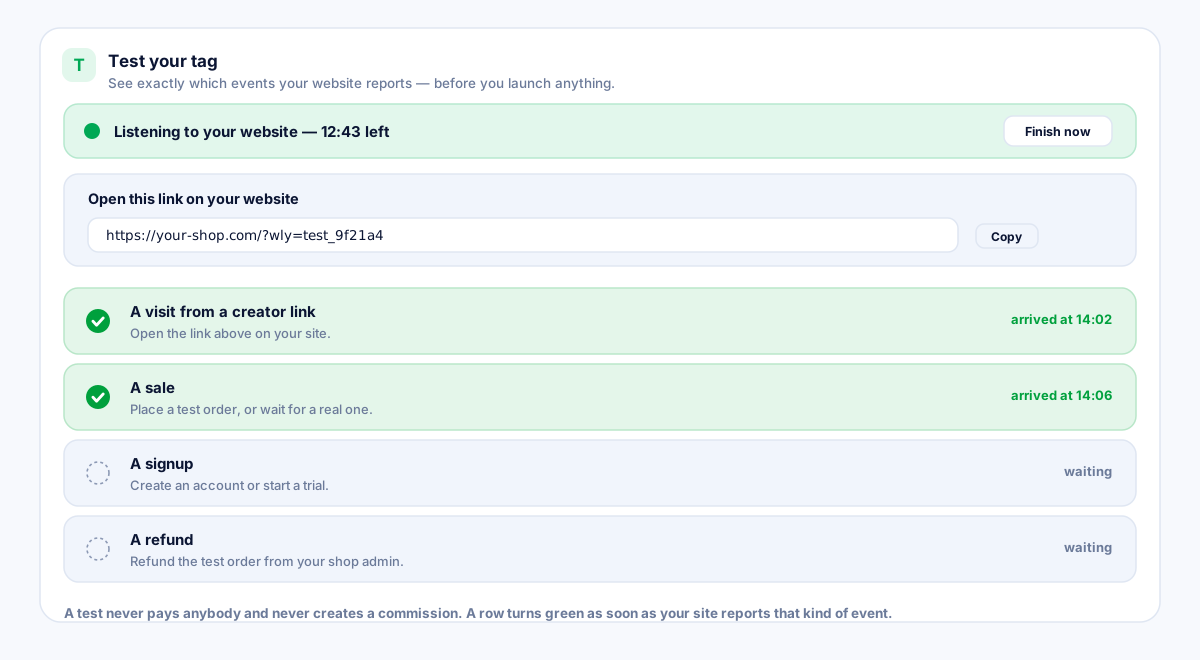
Press Start a test. It opens a listening window and gives you a link to your own site with a test reference at the end. Open that link, then browse as a customer would. Four rows fill in as each thing arrives:
- A visit from a creator link; happens the moment you open the test link.
- A sale; place a test order, or simply wait for a real customer.
- A signup; create an account or start a trial, if you have one.
- A refund; refund the test order from your shop admin.
A row turns green as soon as your website reports that kind of event, whether it came from your own test or from a real customer shopping at the same moment. Either way it proves your site reports it.
Two things people worry about, answered plainly:
- A test never pays anybody and never creates a commission. It costs nothing.
- Sample events; the three buttons marked “Sample sale”, “Sample signup”, “Sample refund” do not touch your website at all, so they cannot tick a row. They show how an event of that shape would be read and what commission it would have produced. Useful for checking pricing; useless for checking installation.
Every test is kept in Test history, scored as “3 of 4 proven”, so you can come back and see what did and did not arrive.
Part 5: What we track, and when to write code
The What we track panel is a reference, not another install. Everything in it comes through the tag you already pasted.
On Shopify, and on any site using Google Tag Manager or GA4, your sales are found automatically: your shop already announces its orders and the tag simply listens. You do not need any of the code below unless a sale does not show up.
Reporting a sale by hand
If your site does not announce orders by itself a custom checkout, a paid newsletter, a booking page, a course, or a finance app- add one line where the payment is confirmed:
<script> wooly("conversion", { // Your customer-facing order number. If anything else reports this same // order to us (your server, a plugin) it must send this exact value, // or the order is counted and paid twice. orderId: "ORDER-1234", value: 129.00, // order total currency: "USD", // Optional, and strongly recommended: this is what lets repeat orders // and renewals still credit the creator once the cookie is gone. customerId: "CUST-5678", // your own customer reference, if you have one email: "buyer@example.com" // hashed on arrival, matched only as a hash }); </script>A worked example. Maya posts your link. Sam clicks it and lands on your shop, and the tag notes “this visit came from Maya's link”. Nine days later Sam comes back on their own and buys a $129 jacket. Your thank-you page reports order 1041 for 129.00, nothing about creators, nothing about money. We match the order to Maya's click, apply the rate that campaign was sold at, and the commission lands in your review queue.
Reporting a signup
Lead campaigns pay on this and nothing else. Do not fire conversion for a signup; it pays the wrong model at the wrong rate.
<script> wooly("lead", { orderId: "SIGNUP-4471", // your own reference for this signup customerId: "CUST-5678", email: "buyer@example.com" // hashed on arrival, matched only as a hash }); </script>A worked example. You pay creators $40 for every free trial. Someone fills in your trial form and lands on “Welcome, check your email”. That moment is the lead, and the creator earns their $40 there and then. If that person buys later, the sale counts too; each campaign pays on whichever it was sold on.
Reporting a refund
<script> wooly("refund", { orderId: "ORDER-1234", // the SAME reference the sale was sent with value: 129.00, // how much came back currency: "USD" }); </script>What a refund does, and does not do. Order 1041 earned Maya $12.90. Three weeks later Sam returns the jacket. The refund arrives with the same order number, and Maya's commission is flagged in your review queue with the amount and the date, and stays exactly where it is until you decide. It never reverses on its own, because a partial refund, a contested chargeback, and one returned item from a bundle all look identical to a website. A commission already paid out is never clawed back.
Not comfortable editing JavaScript?
Any element carrying data-wooly-event is reported once by the tag you already installed. A shop template can nearly always print its order number and total into the page, even where nobody wants to touch code:
<!-- On your order confirmation page. Put your own template's values in. --> <div data-wooly-event="conversion" data-wooly-order-id="ORDER-1234" data-wooly-value="129.00" data-wooly-currency="USD" hidden></div>And if you run a tag manager, push onto the queue instead; pushes made before the tag loads are read the moment it does, so this works on an existing purchase trigger:
<script> window.woolyLayer = window.woolyLayer || []; window.woolyLayer.push({ event: "conversion", orderId: "ORDER-1234", value: 129.00, currency: "USD" }); </script>The one mistake that costs real money
orderId is your own customer-facing order number, and everything that reports the same order must send the identical value. Send #1001 from your theme and Shopify's gid://… or a gateway transaction ID from your server, and those are two different orders to every part of this platform: two sales, two commissions, and no error message anywhere. Pick one reference and use it everywhere, in your sale call, your refund call, and any server reporting.
Part 6: Reporting from your server (all optional)
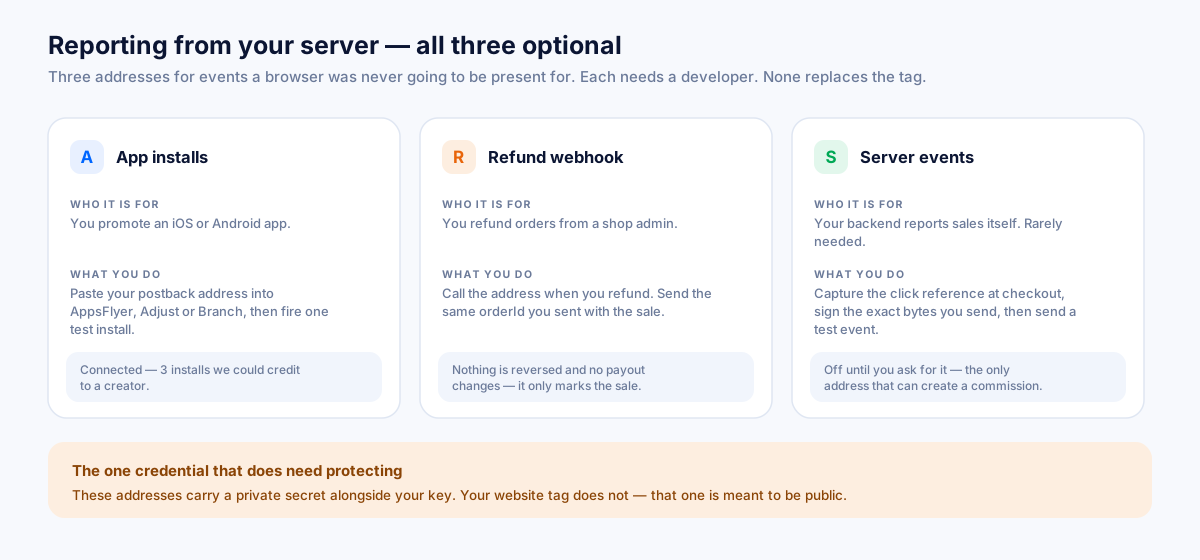
Three addresses, for events a browser was never going to be present for. Each one needs a developer, each carries your secret, and none of them replaces the tag above.
App installs
Your app store listing lives on Apple's and Google's servers, not yours, so no website tag can ever see a download. The only thing that knows is your mobile measurement partner. Copy your postback address from the App installs section, paste it into AppsFlyer, Adjust or Branch, and fire one test install. Once real installs arrive, the panel reads Connected: 3 installs we could credit to a creator.
Note that an install proves nothing until it carries a click reference that resolved. That is why the badge in What we track can honestly read “12 received, 0 payable.” Postbacks are arriving, but none of them so far could be credited to a creator.
Refund webhook
For refunds issued from a shop admin, where no browser is involved. Call the address when you refund an order, and send orderId,the same reference you sent with the sale. Nothing is reversed, no payout changes and no status moves on its own; it raises the flag, and the decision stays yours.
Server events
The advanced one, switched off until you ask for it, because it is the only address on the platform that can create a commission. Three steps: capture the click reference at checkout withwooly("ref"), send it with your signed server call, and sign the exact bytes you send. Plan for an afternoon of developer time rather than a coffee break.
Leaving the tag installed alongside it is fine, as long as both name the order the same way, the same sale is not counted twice.
Every status on the page, explained
Four colours across the whole page, and only one of them ever asks you to do something.
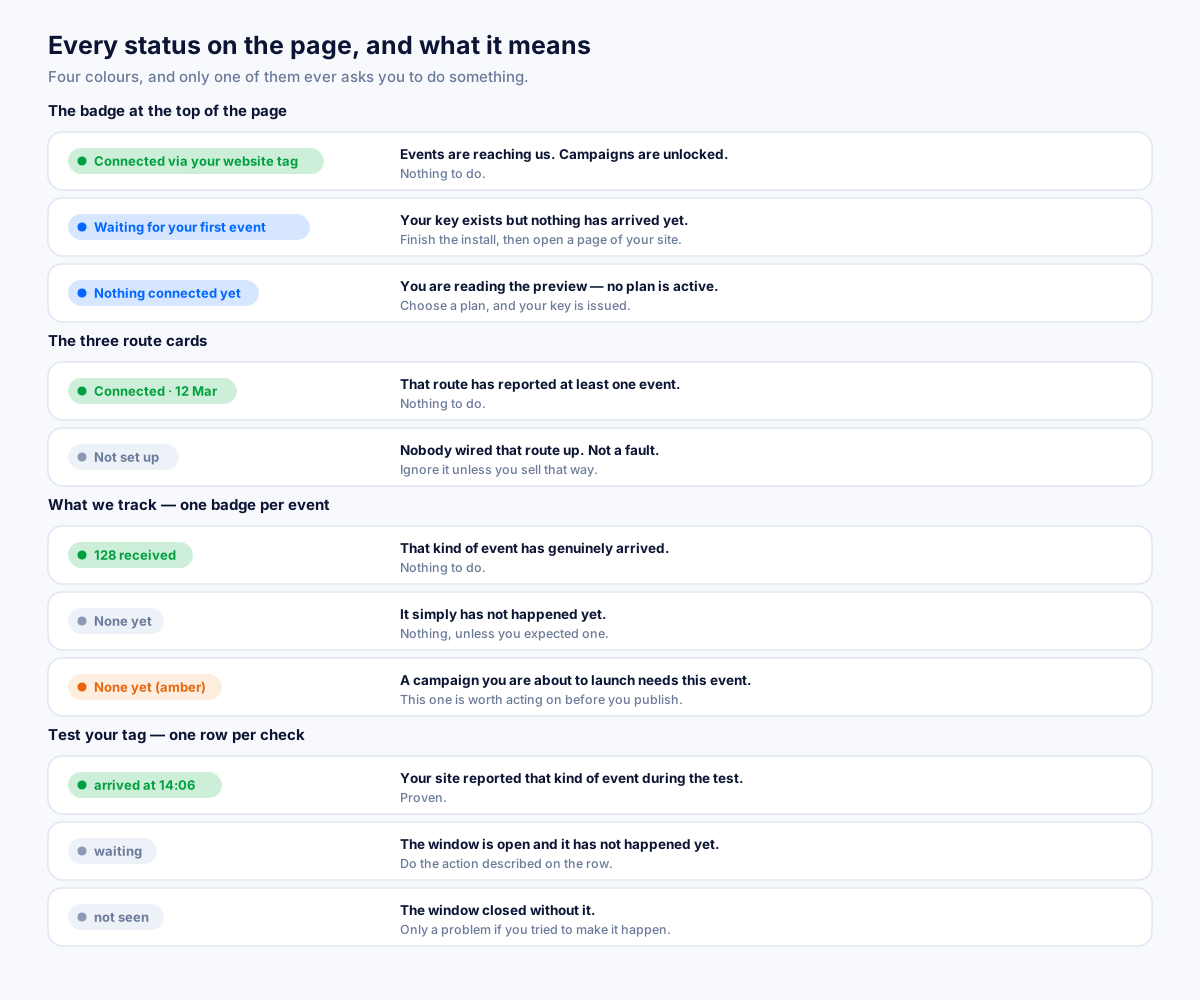
- Green; proved. Something genuinely arrived, and the badge usually carries the date or the count.
- Blue; waiting. It is working; nothing has happened yet.
- Grey; nobody set this up, or this simply has not happened. Not a fault, and never why a campaign is blocked.
- Amber; the only colour worth acting on. It appears on an event a campaign you are about to launch actually needs.
Two more notices you may see on the connection panel, both deliberately neutral:
- “N refunds arrived without an order reference.” We could not tell which sale each one belonged to. No commission was changed, and no payout was affected; send
orderIdwith your refund call to match them in future. - “N refunds named an order we have no sale for.” Either that sale was never reported to us, taken off-site, or placed before the tag went live, or your refund call spells the order reference differently from your sale call.
How to check everything is OK
Run through this, and you are genuinely done, not just probably done:
- The badge at the top is green and names a route. If it is blue, nothing has arrived yet.
- At least one route card is green with a date on it. The others being grey is fine.
- Step 3 of the install reads “Your site is reporting to Wooly Network.”
- You have run a test, and the visit row went green. Ideally, the sale row too.
- In “What we track”, the events your campaigns pay on show a count; “128 received”, not “None yet”. A lead campaign needs signups; an affiliate or CPA campaign needs sales.
- The Live event feed at the bottom shows real lines. It refreshes on its own and shows the last events your key sent, newest first, with the attribution reason on each.
- Your store currency matches your checkout.
If all seven hold, your integration is complete and publishing a campaign will pass its system check without you doing anything.
If something is not working
Almost every failed install is one of three things:
- The change was saved but not published. Webflow, Wix, Squarespace and Google Tag Manager all need that second click. Check your live site, not the editor preview.
- The tag went on one page instead of the site-wide header. It belongs in the template that applies to every page, not in a single page's content block.
- The key was pasted with a piece missing. Copy the tag again from step 1 and re-paste it whole.
A quick way to confirm it is actually there: open your live site, view the page source, and search for data-wooly-key. If you cannot find it, the tag is not on that page.
Other common questions:
- Do I need a different tag for each campaign? No, and there is no way to make one. Your account has a single tracking key and a single tag. Every campaign you run, now or in five years, is measured through it.
- I only sell products. Do I have to add the signup and refund events? No. Add the sale event and stop. The others sit unused and cost nothing; they are there so that the day you launch a lead campaign, the tag can already report it.
- My sales are not being found automatically. Open “What we track”, expand the Sales row, and use the fallback snippet on your confirmation page.
- Is my customers' data safe? The tag reads the creator reference on the landing URL and whatever you choose to send with an order. No names, no card details, no browsing on other websites. An email, if you send one, is scrambled the moment it arrives and never stored in a readable form.
What happens next
Once one route is connected, campaign creation unlocks. Publishing a campaign runs a system check against this integration, and a site already reporting passes it without you doing anything else.
From then on, the Integration setup page is somewhere you visit rarely: to run a test after a site redesign, to check the live feed when a sale looks missing, or to add a server route when your business grows into one.
Related reading
- Affiliate Fraud: How to Spot It and Stop It — The six schemes that actually cost advertisers money, the signals that expose each one, and a review process that catches them without accusing honest partners of anything.
- What Is a Cookie Window in Affiliate Marketing? — The number that decides whether a partner gets paid: how windows work, what length suits your category, why browsers shortened them, and the resets and overlaps that cause most disputes.
- Last Click vs First Click Attribution: Which One Pays the Right Partner? — Why last click quietly overpays coupon sites and underpays the content that created the demand, what the alternatives actually cost to run, and how to test incrementality without rebuilding your stack.
More from the Wooly Network Knowledge Library