Understanding the Payment & Commissions
Every commission status, every payout state, and how each month of accepted commissions becomes one payment.
By Nora Ellis, Affiliate Marketing & Creator Economy Writer · with Wooly Network, Advertiser Success · 31 August 2026 · 7 min · Marketplace Best Practices
Every sale a creator brings you turns into one line of money on the Payments tab. This guide walks that money from the moment it appears to the moment it leaves your account, so you always know what you owe, what you have already settled, and what is still waiting on you.
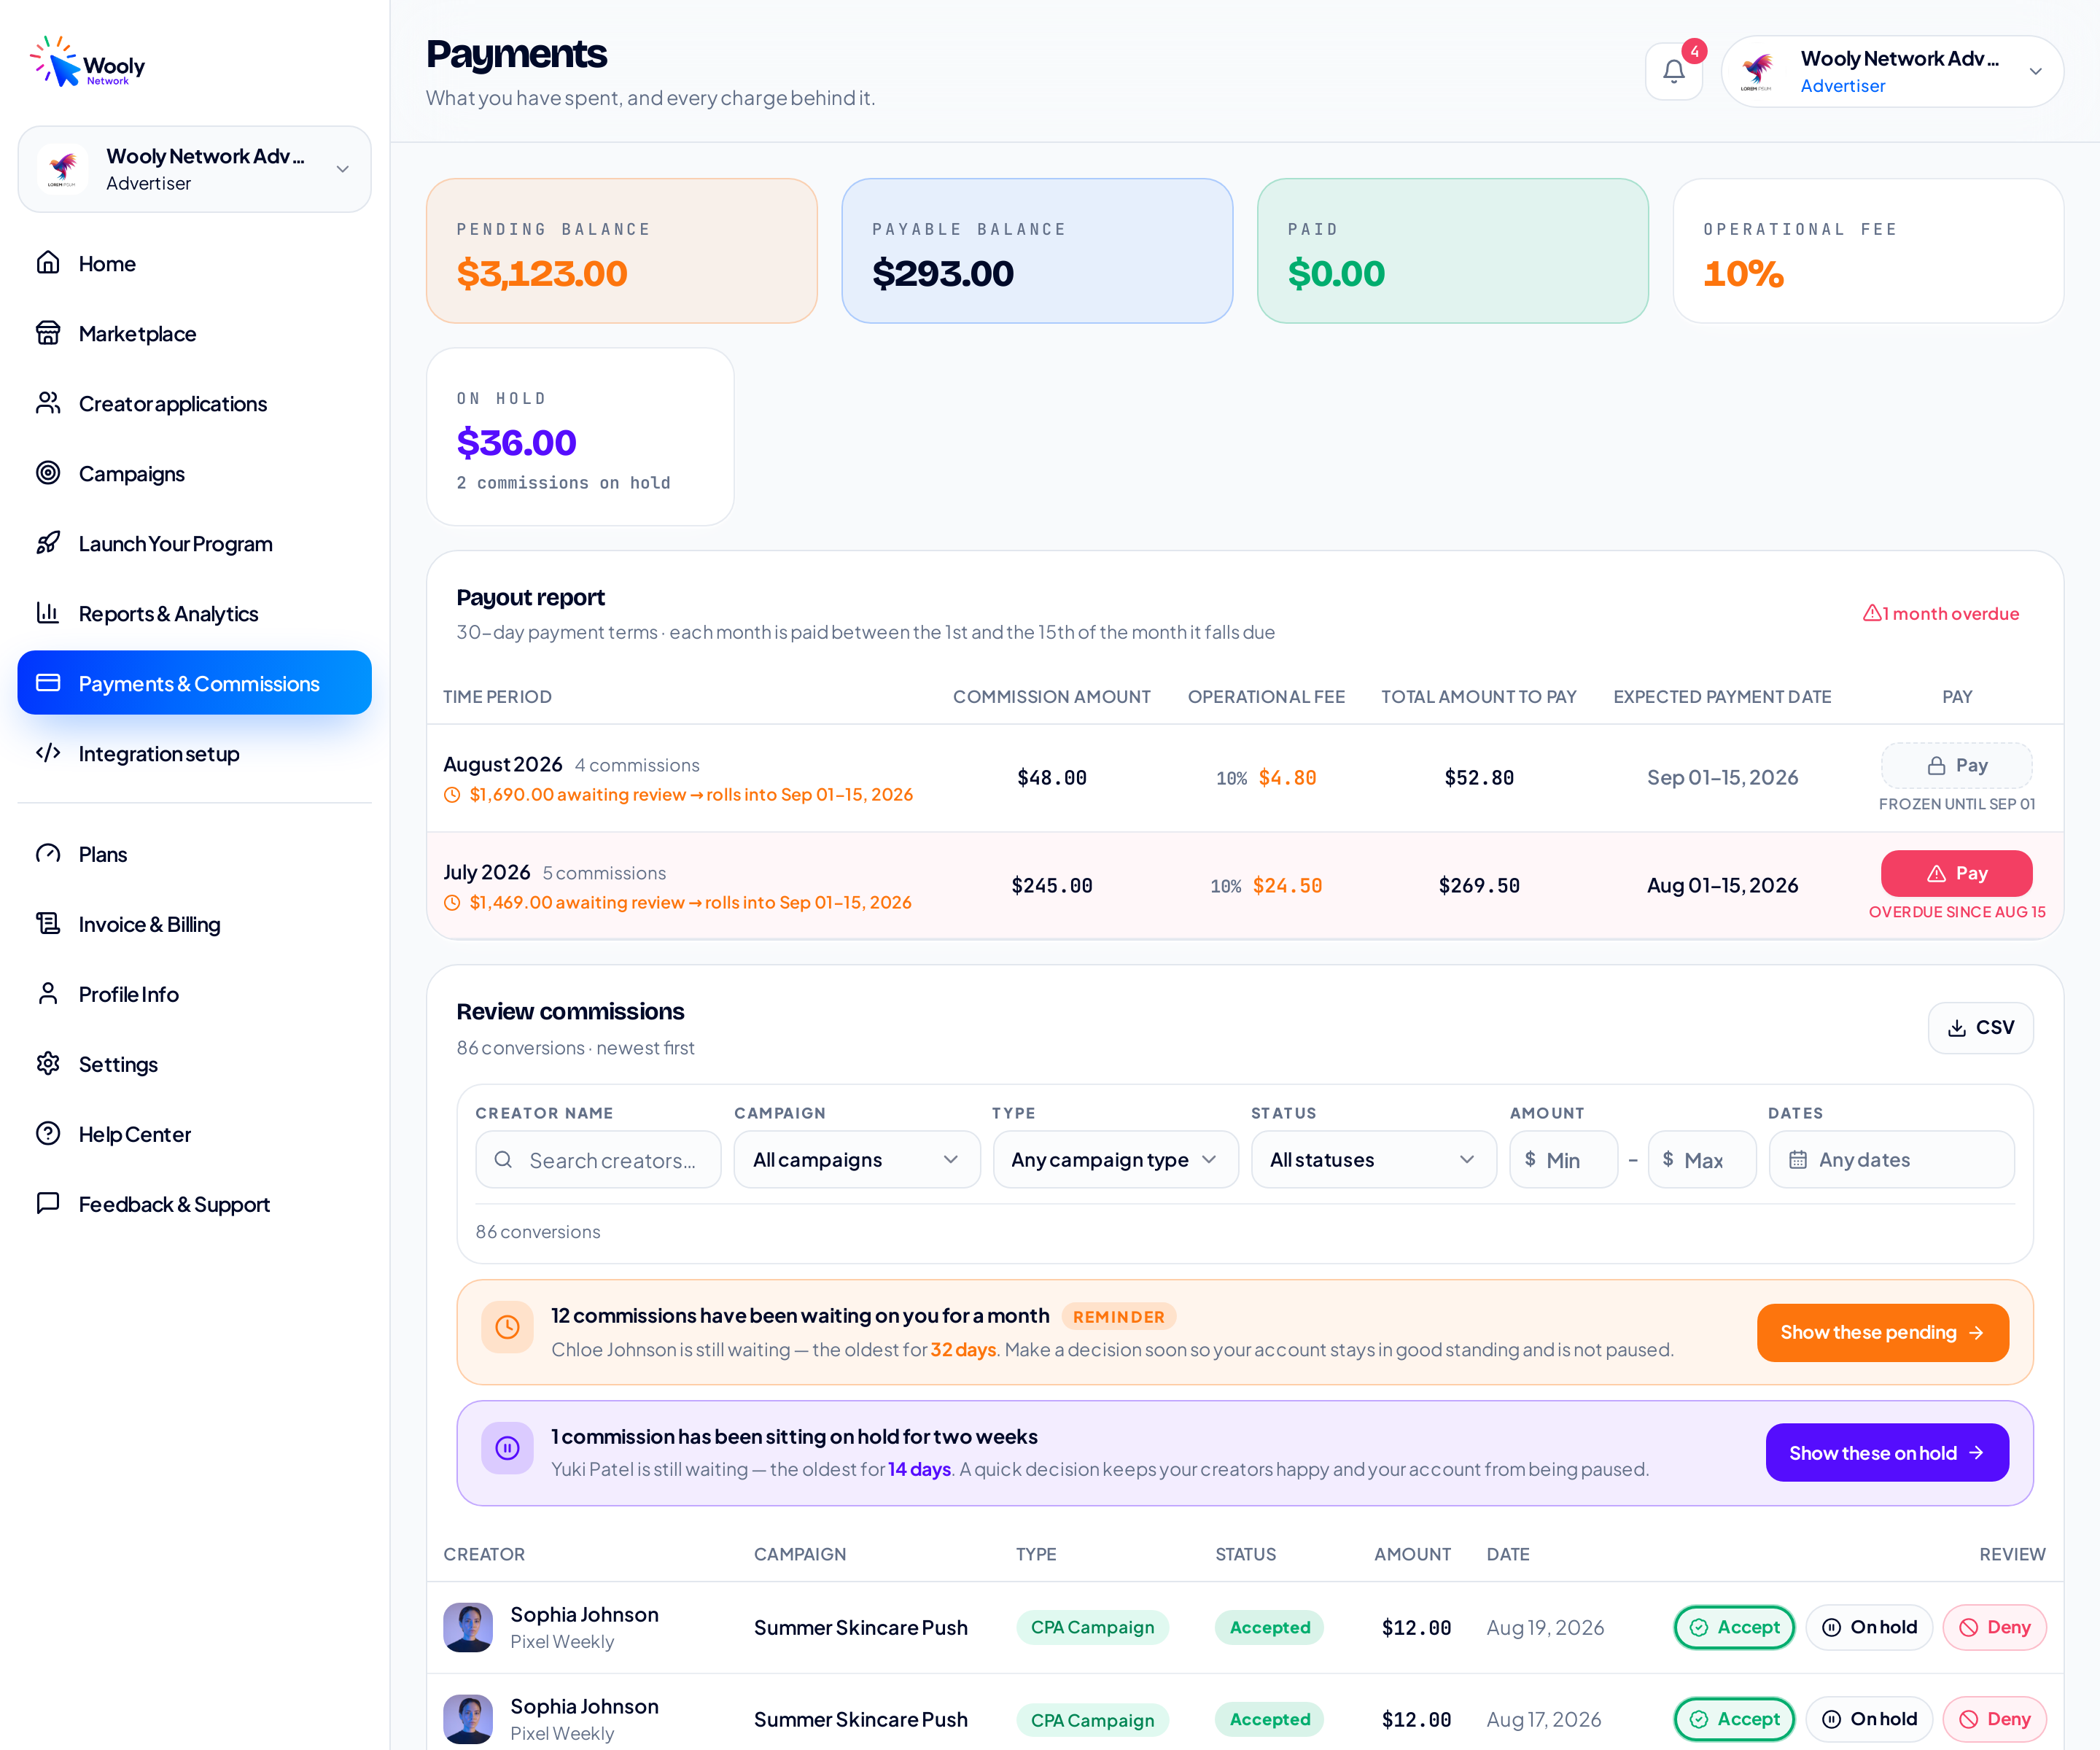
Payments sits in your left sidebar under Payments & Commissions. Everything in this guide lives on this one page.
First, the numbers at the top
The cards across the top are the short version of everything below them, and they all move on their own the second you make a decision.
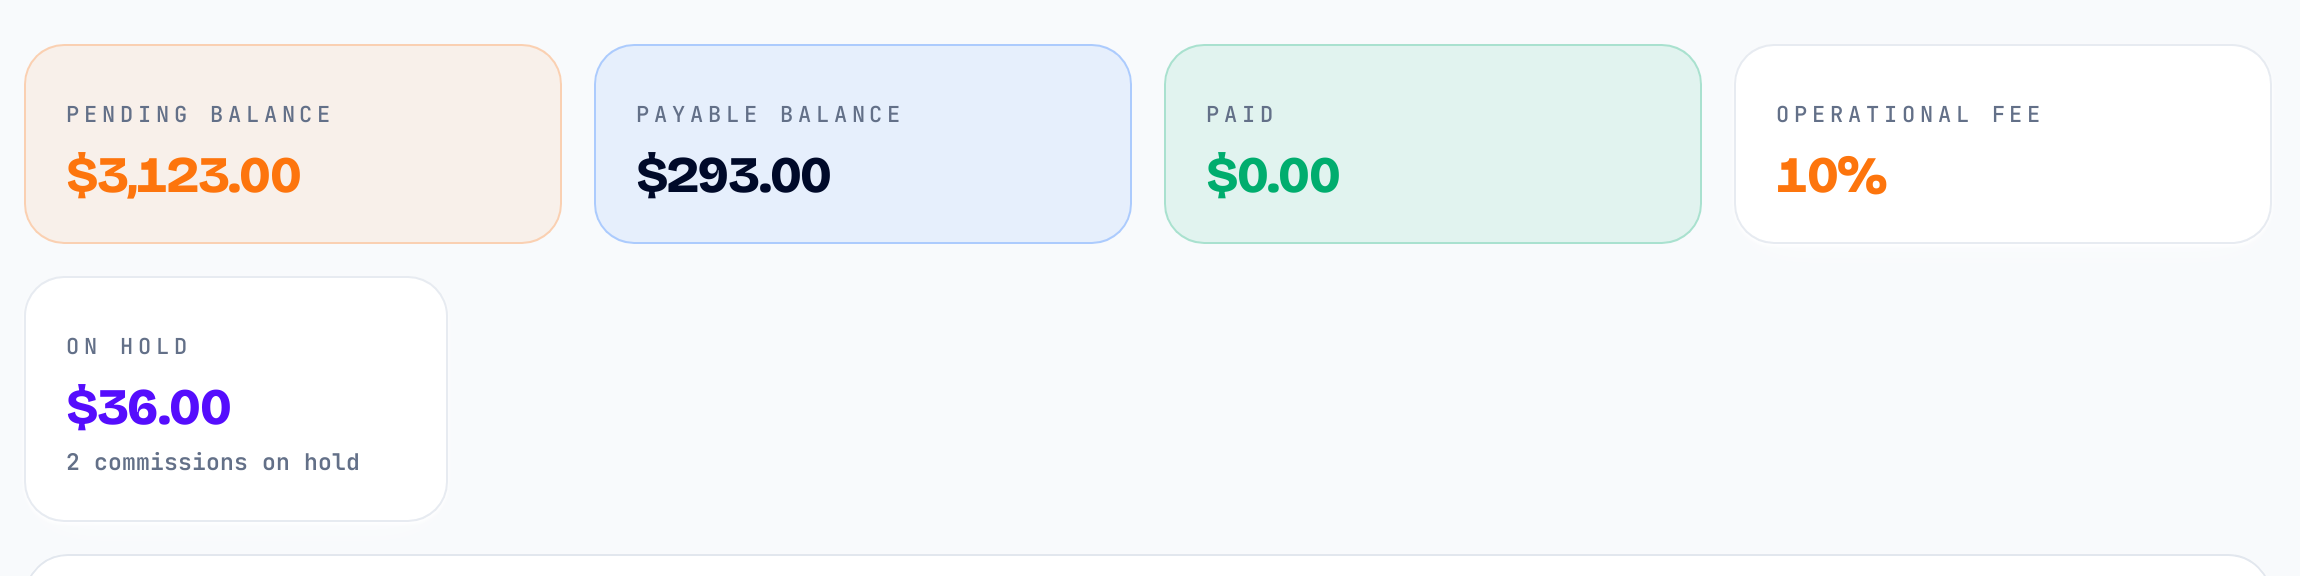
Four cards on the first row, and On hold on its own row underneath.
- Pending Balance; every commission still waiting for your decision. Orange, because it is the only number that needs you.
- Payable Balance; everything you have accepted. This is money you owe and will pay in a monthly payout.
- Paid; everything that has already reached your creators.
- Operational fee; the platform's percentage on top of each payout. It follows your plan: 10% on Growth, 7% on Scale, 5% on Enterprise. Each plan and its fee is listed on Wooly Network pricing.
- On hold; money you have parked. It sits in neither the pending nor the payable balance until you accept or deny it, and the caption counts the held commissions one by one.
Part one: Commissions
A commission is one conversion. One sale, one lead, one row. The rows come from the creators you let into your campaigns, so the quality of what you review here starts back on the creator applications screen.
Every conversion arrives as Pending. Nothing is auto-accepted and nothing is auto-denied; the decision is always yours.
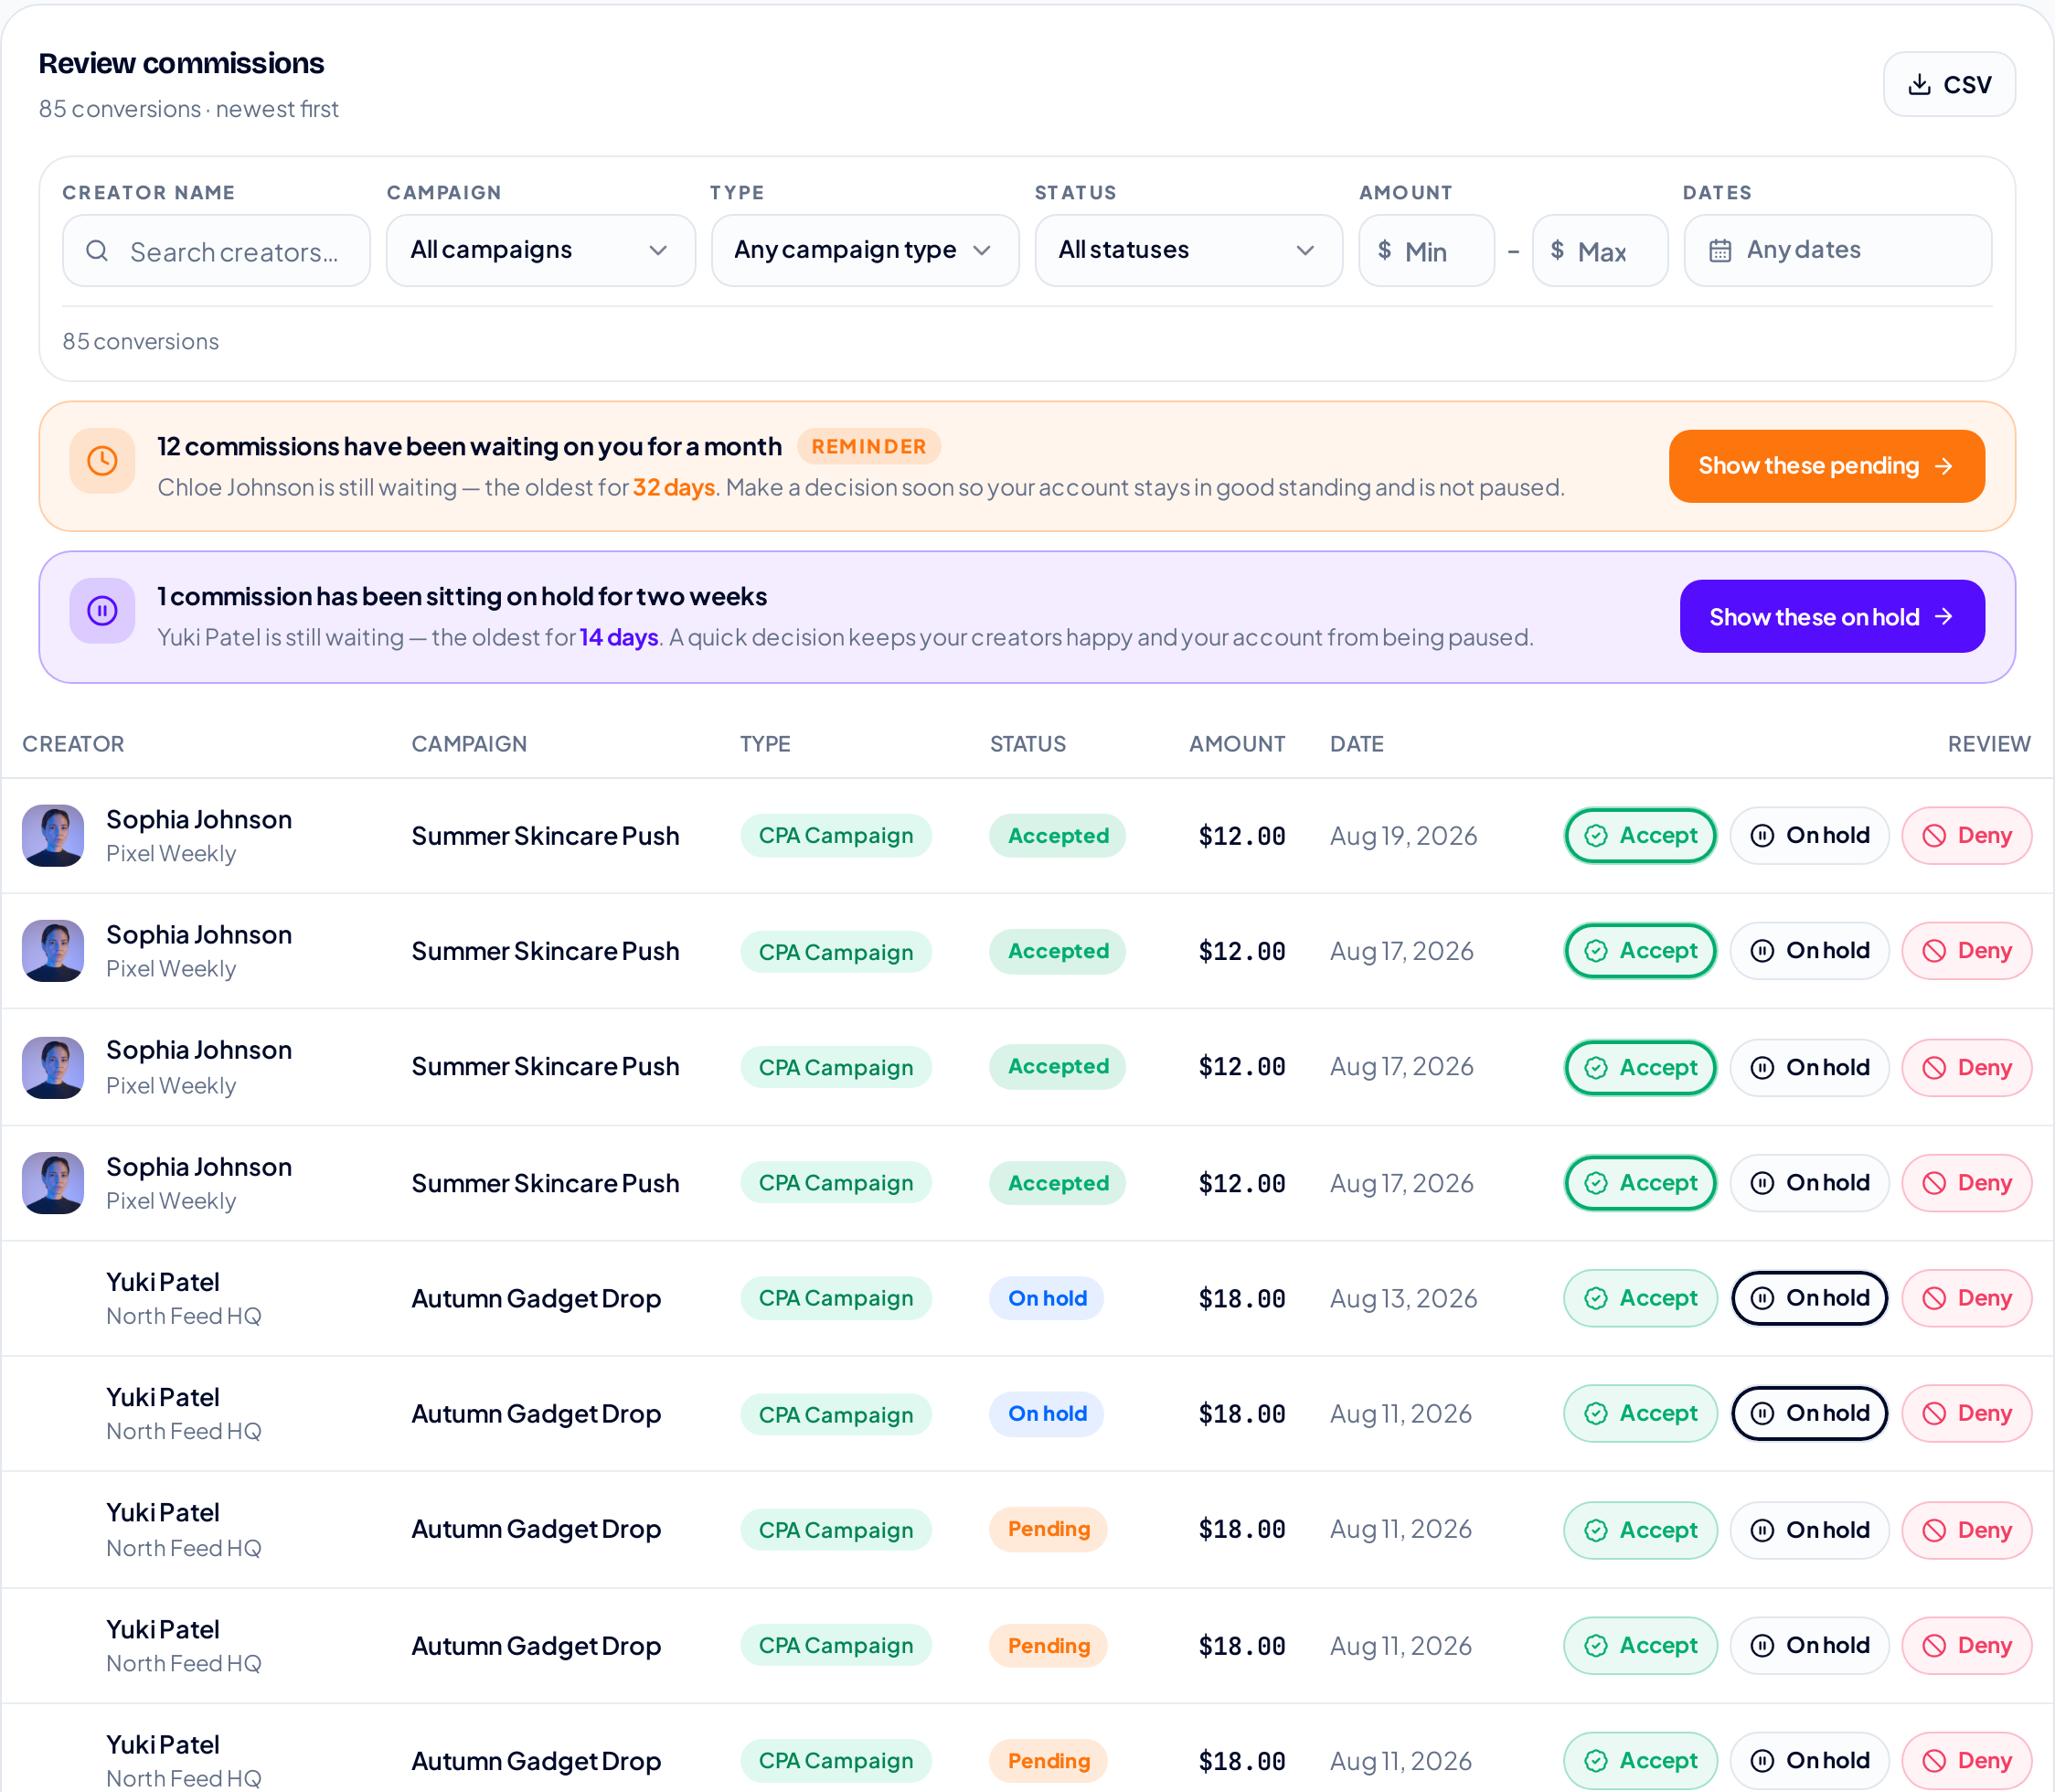
Review commissions: newest first, with Accept, On hold and Deny on every row.
Finding the rows you want
Six filters sit above the table: creator name, campaign, campaign type, status, an amount window and a date window. They stack, and the line underneath tells you how much of the table you are looking at.

Type a creator's name, narrow to one campaign, or set a minimum amount; the count updates as you go.
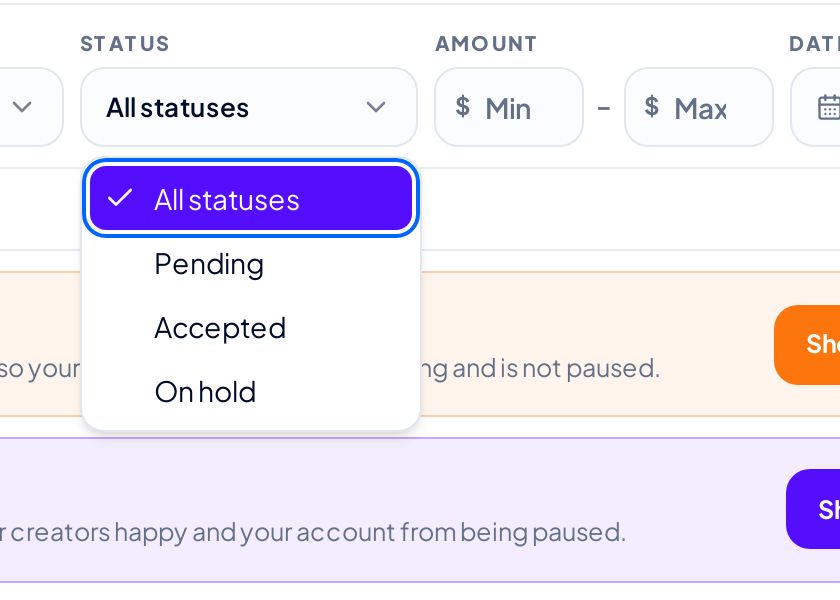
The status filter here only offers Pending, Accepted and On hold, because those are the only statuses a row in review can have.
The five statuses, one by one
1. Pending; it has landed and nobody has touched it. It counts towards your Pending Balance and it is what the three buttons on the right are for.

A pending row: creator, campaign, campaign type, status, amount and the conversion date.
2. Accepted; you are happy with the sale. The amount leaves the Pending Balance and joins the Payable Balance, which means it will be included in a monthly payout. The button you chose stays outlined so you can always see the standing decision at a glance.

Accepted. Clicking the same button again does nothing; it is already the decision on record.
3. On hold; you are not sure yet. Held money leaves the Pending Balance and stays out of the Payable Balance, so it cannot be paid by accident while you check the order. It shows up in the On hold card at the top of the page until you come back to it.

On hold: parked, visible, and out of both balances.
Changing your mind is always allowed. Pressing the status a row already has sends it back to Pending, and the money returns to the Pending Balance.
4. Denied; the sale is not valid. Denying asks for two things before the button will work: one reason, and a short note.
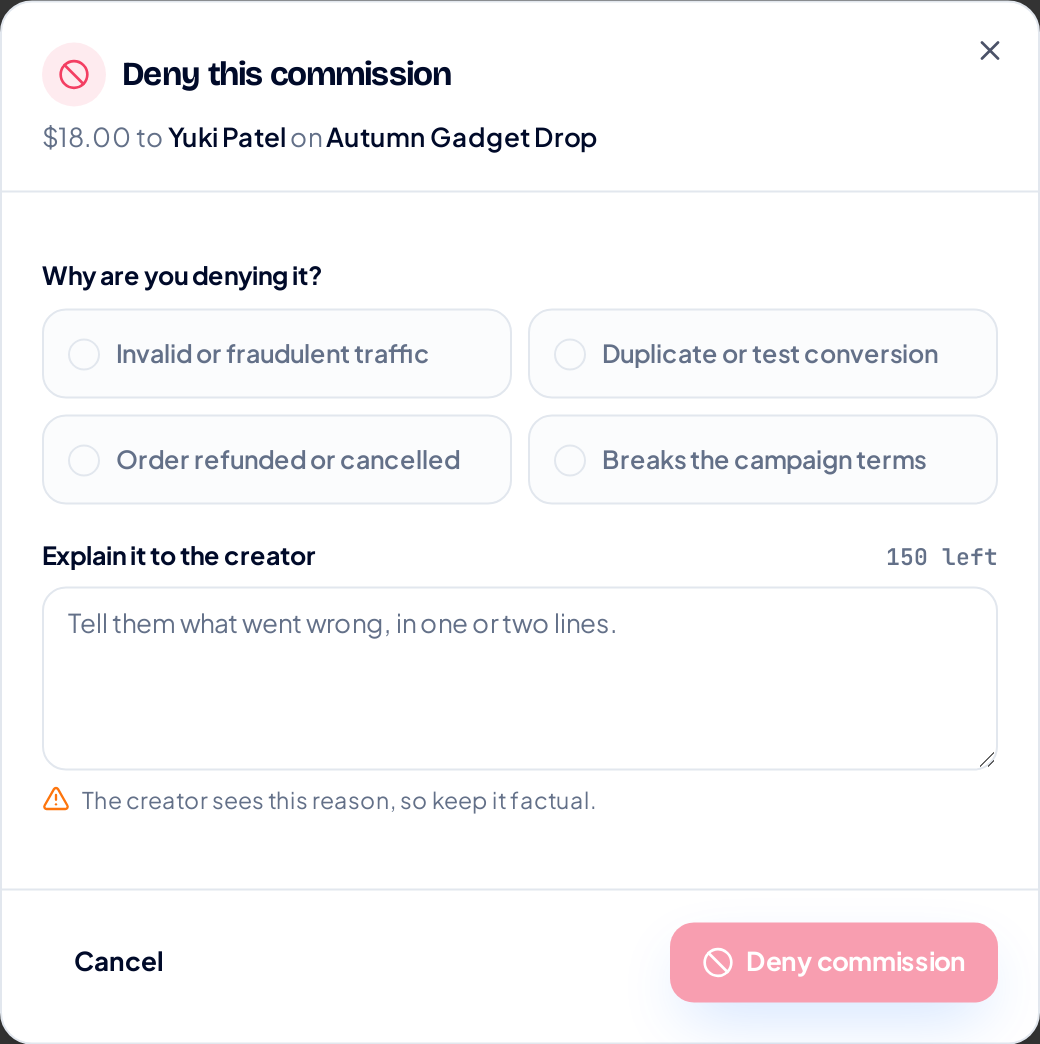
Four reasons: invalid or fraudulent traffic, duplicate or test conversion, order refunded or cancelled, or breaks the campaign terms. The note is capped at 150 characters.
Your note goes straight to the creator, word for word, so keep it factual. Denied money never reaches a payout; it leaves your balances entirely and moves to Commission history.

A denied row keeps its reason attached to it, forever.
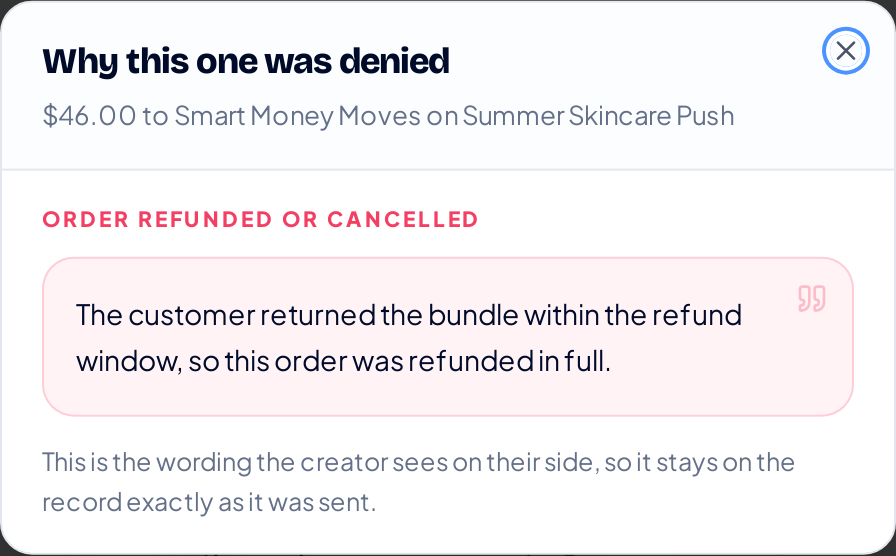
Click the Denied pill any time to re-read exactly what the creator was told.
5. Paid; the commission has been settled in a monthly payout. This is the one status you cannot change: try it and the platform will tell you the commission has already been paid, so it can no longer be changed.

Paid. Done, and on the record.
Marks you may see beside a status
Some rows carry a little more than a status. A small orange circle with a number in it can sit at the end of the row, and one or more coloured labels can sit just under the status. Both are the platform telling you what it noticed about that one sale.
It is worth saying plainly what they are not. Nothing has been held back, nothing has been reversed, and the commission is exactly the amount it always was. Accept, On hold and Deny behave the same on a marked row as on a clean one. These marks only tell you which rows are worth opening first.
Ana Petrescu
Nordic Supply Co. · Sale
Pending
Ghost click Bot speed
$48.00
14 Aug
2A marked row: the status is still Pending and the amount is still $48.00. The labels sit under the status, the attention score sits at the end of the row.
The orange circle: your attention score
A number from 1 to 5. The higher it is, the more there is worth reading on that row. It is not a percentage, not a risk rating and not a verdict; it is our own internal number, weighed from the few things we can see about that one sale from our side. It is never about a creator, only about the single sale it sits on, and it decides nothing on its own.
Open the row and the same score is printed in full, with the short reasons that built it, so you always know what the number was made of.
The four labels
Four labels can appear under a status. Each one is a button: click it and the full explanation opens right there, without opening the whole row.
- Ghost click; your link was clicked, but your page never reported anybody arriving. Genuine shoppers do produce this: they block scripts, the sale is reported by your server, or the tag is installed on your checkout page and not on your landing page. It is also what a stuffed cookie looks like from here, which is why you are shown it rather than being told what it means.
- Bot speed; less time passed between the click and the sale than it takes to load a page and enter a card. A repeat customer with a saved card does this honestly, and so does a click fabricated a moment before a purchase that was going to happen anyway.
- Burst click; the click behind this sale arrived inside a run of rapid clicks from one address, so we left that click out of your click totals to keep that number honest.
- Crawler click; the click came from something that named itself as automated software, usually a crawler or a chat app generating a link preview, so it was left out of your click totals too.
The last two are different from the first two, and the difference is worth holding on to. Ghost click and Bot speed describe something we noticed. Burst click and Crawler click describe something we did: we left one click out of a count. Your click numbers in the reports get more honest because of it, and the sale itself was tracked, attributed and priced exactly like any other.
What you see when you open the row
Click a marked row and everything behind the marks is written out in full. A coloured banner at the top explains each label in a sentence, the attention score appears with the reasons that made it, and anything else the platform noticed is listed underneath, under What we noticed about this conversion, with the caveat printed next to each one.
Nothing in that list is a conclusion, and the check that actually settles a sale is the one we cannot do: open the order in your own store and see whether the customer, the payment and the basket look real. Then accept, hold or deny exactly as you would have anyway.
Where finished commissions go
Once a commission is denied or paid, its review is over and it moves out of the review table into Commission history; same columns, same six filters, minus the buttons.
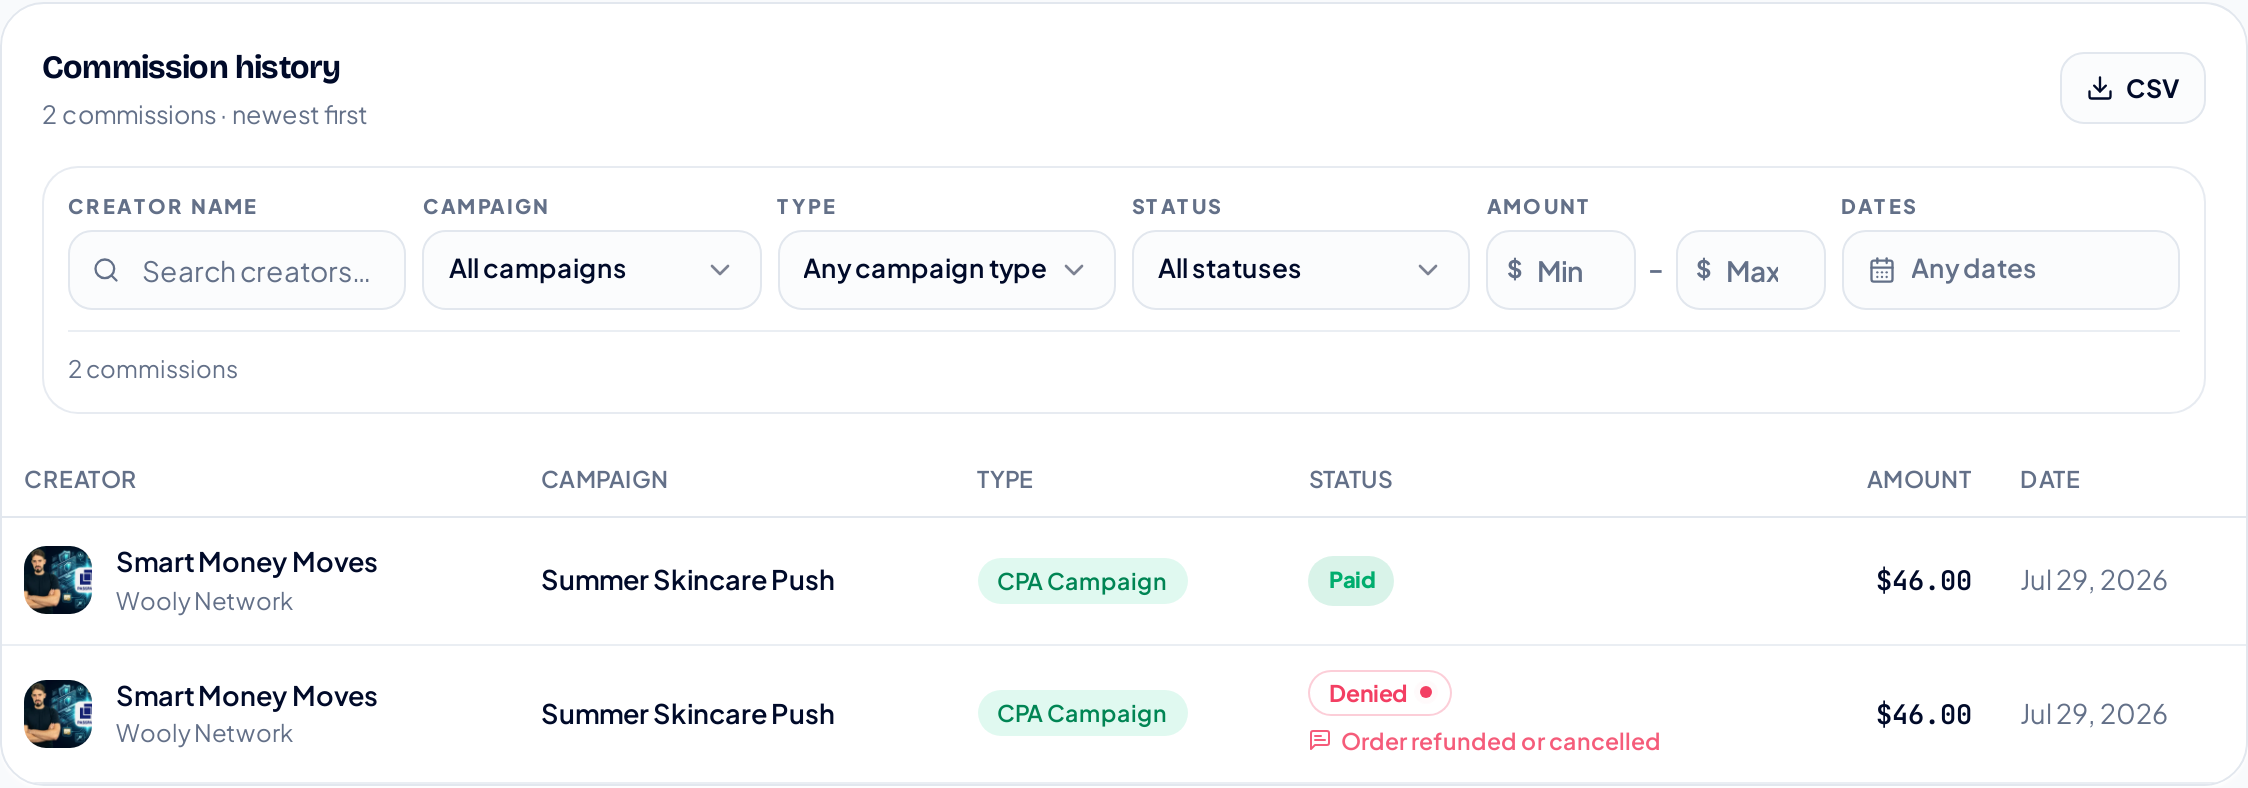
Commission history keeps both endings side by side: paid in green, denied in red with its reason underneath.
Both tables export to CSV, with an optional date window if you only want part of the year.
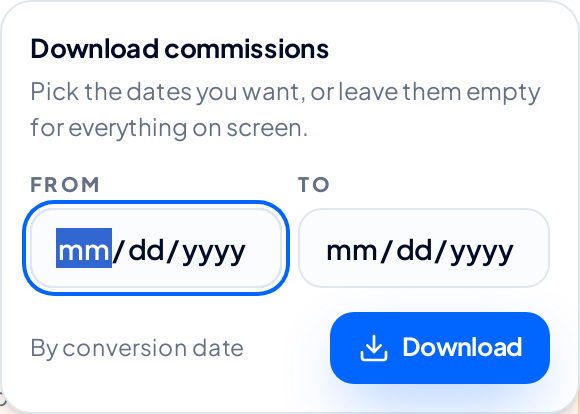
Leave the dates empty to export everything currently on screen.
Reviewing on time matters
Pending and held commissions are gently chased for you. Notices appear above the table once rows have been waiting two weeks, a month, 45 days and 60 days, and at 60 days your account is at risk of being paused, which stops your campaigns. Reviewing as you go is the whole trick.
Part two: Payouts
You never pay commissions one at a time. Accepted commissions are grouped by the month the conversion happened in, and each month becomes a single payment. The Payout report is where that happens.
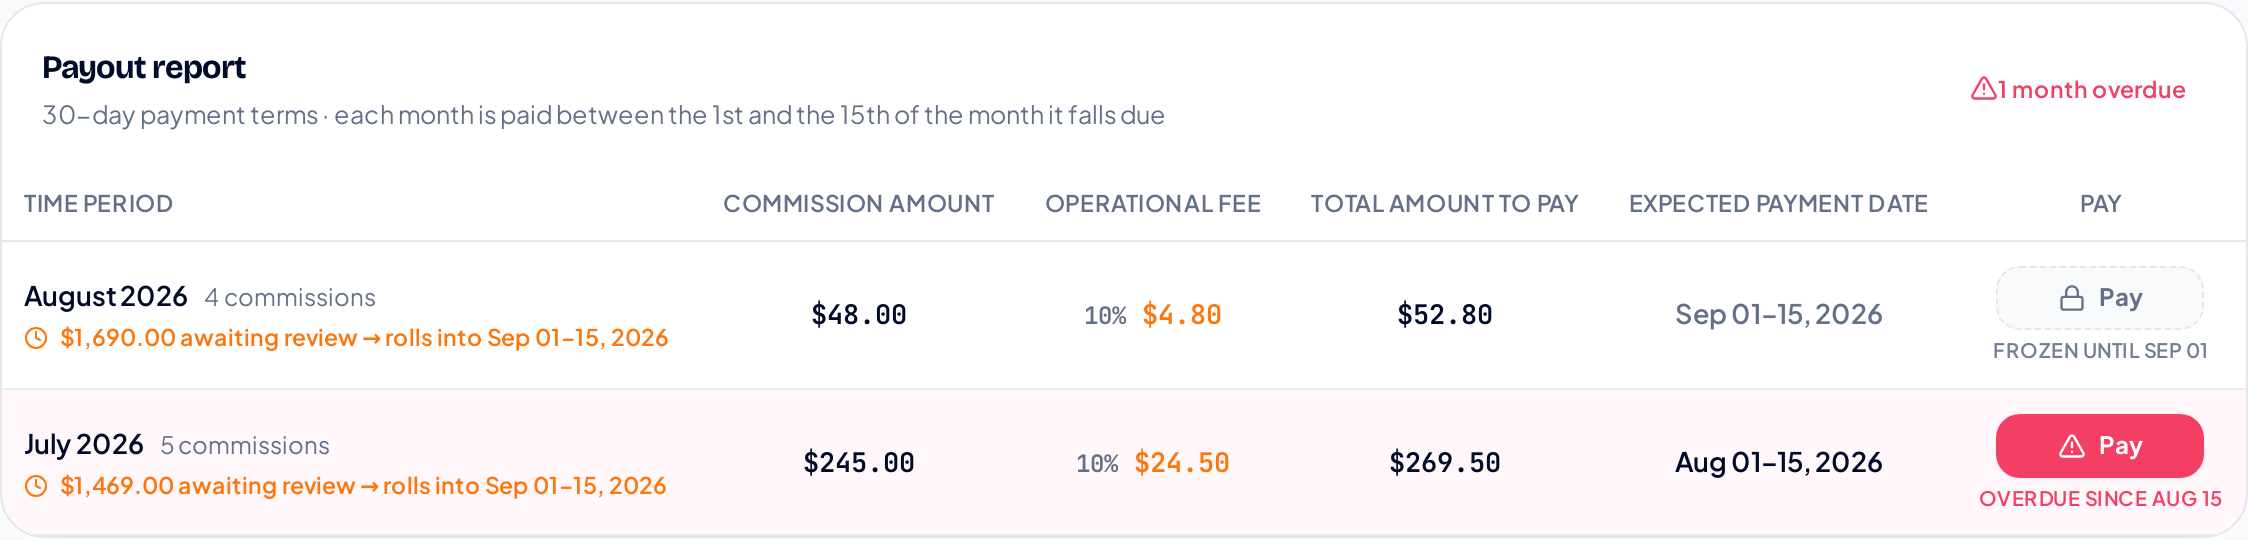
One row per earning month: what the commissions add up to, the operational fee, the total, when it is due, and the Pay button.
How the due date is worked out
Your payment terms decide it. On 30-day terms a month is paid the month after it was earned; on 60-day terms, two months after. Either way, the window is always between the 1st and the 15th of the month it falls due, so July's commissions on 30-day terms are payable 1–15 August.
The panel's subtitle always spells out the terms you are on, so you never have to remember.
The four shapes of the Pay button
Frozen; the month has not come due yet. The button is dashed and locked, with the date it unlocks underneath. Hovering it tells you how many days are left and which window that month falls into.

August is not payable yet: frozen until 1 September, when its window opens.
Due; the window is open and the button is live and green. Pay it whenever suits you between the 1st and the 15th.
Overdue; the window closed and the month is still unpaid. The whole row turns red, the button turns red, and a count of overdue months appears in the panel header. This is the state to clear first.

Overdue since 15 August. Creators are waiting on this one.
Awaiting review; a month where nothing has been accepted yet has nothing to pay, so it shows a dashed “Awaiting review” chip instead of a button. Go and make some decisions and it will come alive.
What happens when you press Pay
A confirmation comes first, and it shows you the whole sum: the commissions, the operational fee on top, and the total.
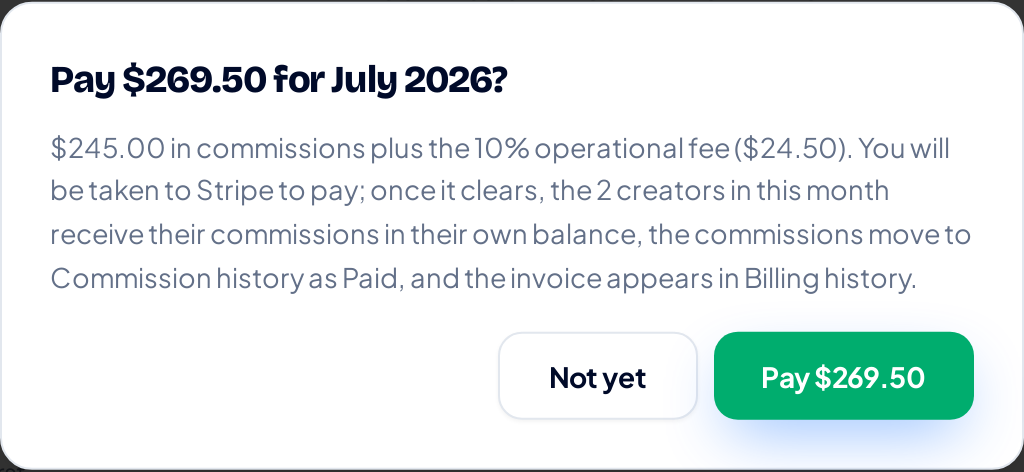
The dialog spells out exactly what your money does next before you commit to anything.
Confirming takes you to Stripe. Once the payment clears, four things happen at once: each creator in that month receives their commission in their own balance, those commissions become Paid in Commission history, the month's row shows a green Paid chip, and the invoice appears in your Billing history.

A settled month keeps its figures on the record with a Paid chip where the button used to be.
Money that arrives late
You will often see an orange line under a month, saying how much is still awaiting review and which window it will roll into. That is the platform being tidy: anything you accept after a month has been paid, or after its window has closed, is never quietly re-billed to a settled month; it is carried forward into the next payout window instead. So a late decision costs you nothing but time, and the report always adds up.
Once a month has been paid or has gone overdue, its dates are pinned and stop moving, so the history you paid against is the history you keep.
A short checklist
- Clear your Pending Balance regularly: accept the good sales, hold the ones you are checking, deny with a reason.
- Watch the Payout report header for anything overdue and clear that first.
- Pay each month between the 1st and the 15th of its window and nothing ever ages.
- Export a CSV whenever you need the numbers outside the platform, your reports then tell you whether that spend was worth it.
Ready when you are
Launch your first campaign
Pick a payout model, set the commission you are happy to pay and publish to the marketplace; the balances on this page start filling themselves in from there.
Launch your first campaign →Related reading
- How to approve the right creators — A walkthrough of the Creator applications tab: every status explained, what each button does, and exactly what changes for the creator when you press it.
- How to create your first Campaign — A step-by-step walkthrough of the Launch Your Program tab: every field, all four campaign types, and exactly what creators see when you publish.
- How to set commission payment terms — The waiting period creators see before they apply: what 30 and 60 days mean, and how to pick yours in four clicks.
More from the Wooly Network Knowledge Library